My guided story how to install Home Assistant as a Proxmox virtual machine

Andy Haluza
JS developer, tech geek
Table of Contents:
Home Assistant is a popular open-source home automation platform that can be installed on a variety of hardware. One option is to install it on a home server or purchase hardware with Home Assistant pre-installed, such as HA Yellow. However, if you're looking for more flexibility, Proxmox is a great choice. Proxmox is open-source virtualization management software that allows you to manage virtual machines and containers. It's free, easy to install, and has a large community to help with any issues you may encounter.
The main goal of installing HA on the Proxmox for me was the ability to have separate environments for home server needs. My primary plan was to build a personal home ecosystem with a bunch of services including HA, some media service to watch movies and series with high resolution and without lags, dynamic DNS for blocking ads and tracking requests, and some file storage possibilities. To cover all these needs I’ve decided to use one dedicated mini PC, with some performance reserve, instead of using separate dedicated PCs for each service, as there are some disadvantages for me, which I wouldn’t accept. Like maintaining each server separately, especially the first setup - it’s required to connect directly to the PC to install some OS. Also, a mini PC mostly uses default storage as a micro SD card it’s not very stable, because with many write operations they break down, so to handle it need to add additional storage for each machine, I’m not sure if would it be worth that money.
For my needs, I’ve decided to buy a brand new PC with no outdated hardware and the possibility to upgrade some components in the future if needed. So my choice is fallen to Beelink Mini S with Intel N5095 on the board, 16Gb RAM, 256Gb SSD. I’ve chosen max available RAM option, but not ROM because it supports up to 2TB, so if any need it can be easily replaced. Also, it has cooler, but for now I’ve never heard how it works, only at start up it produces not very a bit of noise. It cost me $130 on Feb 2022 discounts(160 regular price).
It was totally easy to install Proxmox the first time, on you need a bit of patience and follow the installation guide, in short:
1 Download ISO of Proxmox Virtual Environment (VE) from the official site - link.
2 Prepare your flash drive for burning ISO. I’ve used 2Gb micro SD with USB adapter, yeah I know, it was fun and it works, so you can use any other option.
3 Use Etcher (or any) for flash ISO
4 Plug into your PC, run bootable menu, and pick your USB flash drive to start
5 Follow up the installation process, you can select all steps with default configs, if you don’t need any customization.
The only thing I’ve had an issue with is its networking. I’ve tried to set up primary and default connection via WiFi, but without a piece of luck. Ideally placed for a home server for me would be a pantry. There is con which are overlaps with the pros.
Pros:
- it’s the middle of the apartment, so higher range to the WiFi and Bluetooth devices, without additional stuff for coverage improvements (anyway I’ve already ordered few ESP32 to increase BLE coverage for HA)
- it’s always cooler, than in the rest of the rooms
- this PC has a cooler, so it can be loud under the load, so behind the doors it would never hear at all
Cons:
- network connectivity over WiFi, as a result, latencies and might be stability issues
It’s not recommended to use Proxmox with a wireless connection.
After the installation of Proxmox, there are a few ways to use stuff there. It’s containers or instances, I’d choose to use an instance for HA. The basement for that is Debian 11, so I downloaded ISO from the official site.
The last step of the installation process it’s installing HA itself. The straight way and recommended method by HA documentation it’s Home Assistant Operating System. There are a bunch of variations of installation supported officially. But after some research, I've found the easiest way to install it as Proxmox virtual machine. All you need to do it's run a single command in the terminal of Proxmox and the script will do everything by itself, from you need to only fill out prompts for a set configuration. This script downloads a propper ova image from Home Assistant server\github and installs it with preconfigured settings. Note that the minimum recommended assignments for Home Assistant are 2GB RAM, 32GB storage, and 2vCPU. After the script is finished you're got a fully installed Home Assistant server on your Proxmox virtual machine.
bash -c "$(wget -qLO - https://github.com/tteck/Proxmox/raw/main/vm/haos-vm-v5.sh)"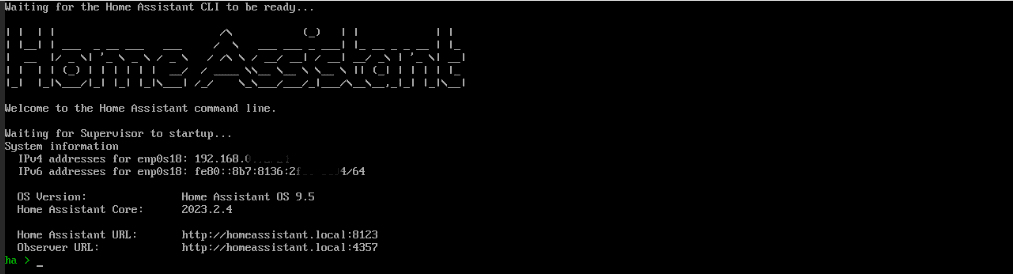
Installing Home Assistant on Proxmox is a great way to create a personal home ecosystem with multiple services on one dedicated mini PC. Proxmox is free, easy to install, and has a large community to help with any issues you may encounter. By following this step-by-step guide, you can quickly and easily install Home Assistant on Proxmox and start building your home automation system. Thank you for reading!
Andy Haluza
Author bio: JS developer, tech geek
